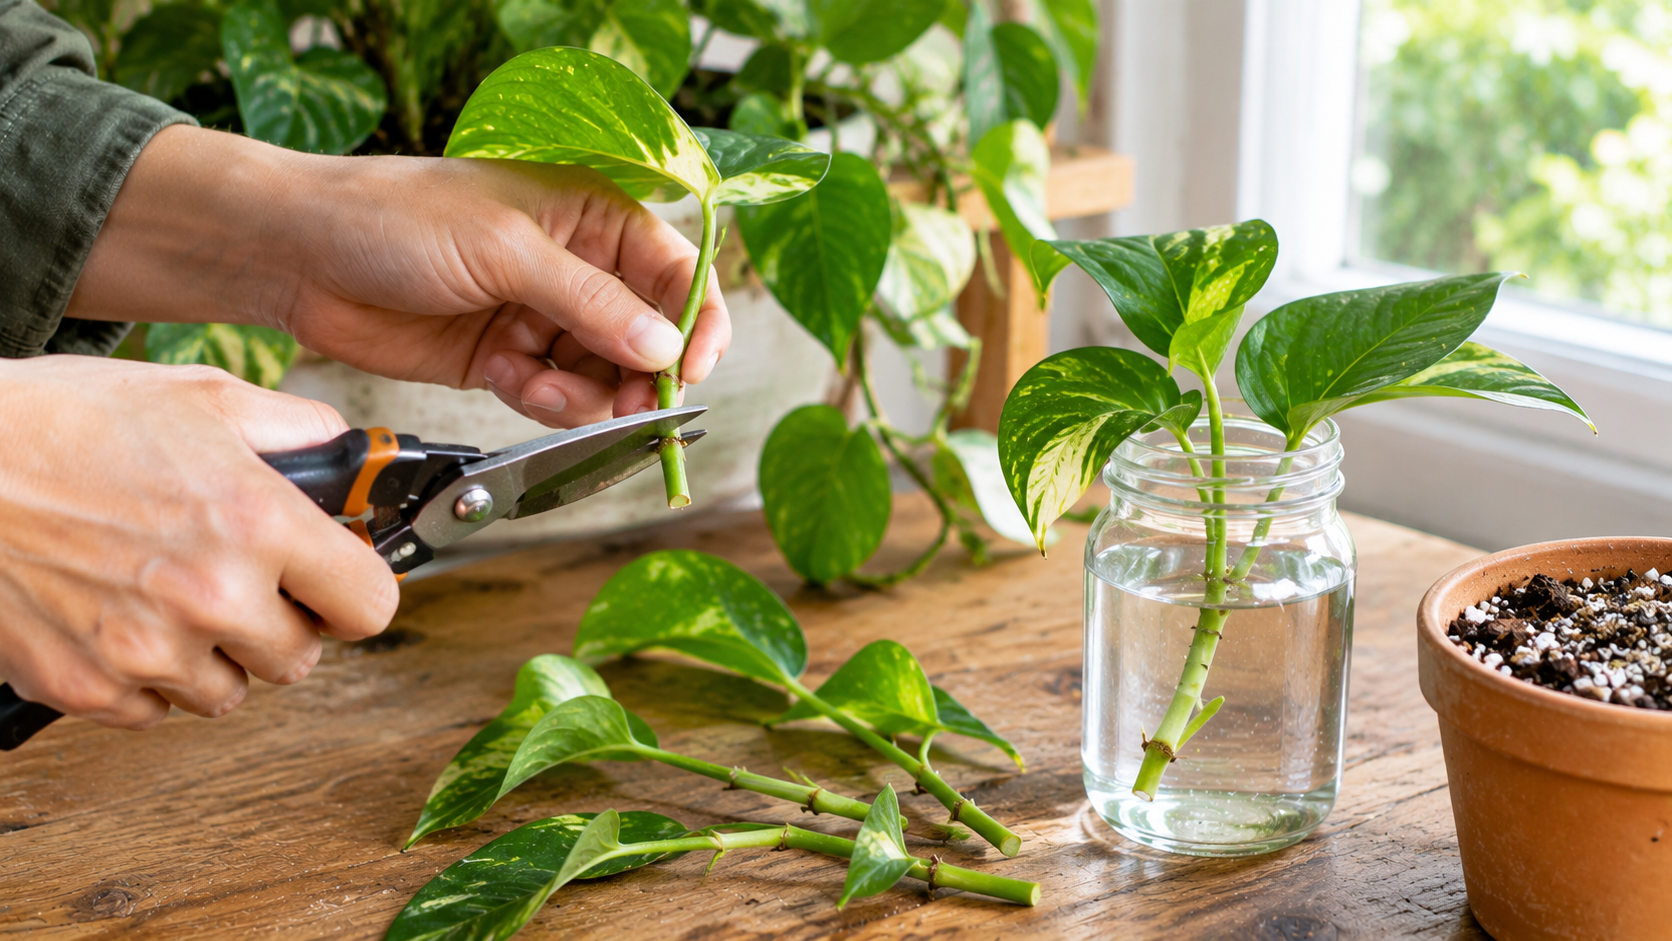
Making new plants from cuttings is one of the most practical ways to expand a home garden without buying a new plant each time. You can often turn a healthy stem into a new plant by choosing the right section, making a clean cut, and providing suitable conditions for root development.
The tricky part is knowing where to cut the stem. Cutting too far from the right growth point, choosing unhealthy material, or leaving too many leaves on a small cutting can reduce your chances of success. The ideal technique also varies depending on the plant species and whether the stem is soft, semi-mature, or woody.
This guide explains how stem cuttings work, how to identify nodes, where to make each cut, and how to care for the cutting until it develops roots.
What Is Plant Propagation by Cuttings?
Propagation by cuttings is a form of vegetative reproduction. Instead of growing a plant from a seed, you use a piece of an existing plant to produce a new one.
When the cutting belongs to a suitable species and receives the right care, it can develop roots and eventually grow independently. The new plant is generally a genetic copy of its parent, which is useful when you want to preserve particular leaf colors, flower characteristics, or growth habits.
Many common houseplants, herbs, climbers, and garden shrubs can be propagated this way. Pothos, tradescantia, coleus, mint, and some types of hydrangea are familiar examples, although the best method and timing differ by species.
Not every plant can be propagated successfully from a stem cutting. Some grow more reliably from leaves, roots, division, or seeds, so check the requirements of the specific plant before starting.
Understand the Stem Before Making a Cut
The most important step is learning to recognize the structures on a plant’s stem. Once you can identify them, choosing the correct cutting point becomes much easier.
What Is a Node?
A node is the point on a stem where a leaf, bud, or side shoot grows or can develop. It often looks like a small joint, slight swelling, or point where the leaf stalk attaches to the stem.
Nodes are especially important because many plants can produce new roots from this area. For common nodal stem cuttings, the lower cut is therefore made just below a node.
Look closely at the stem rather than relying on its overall length. On a pothos vine, for example, you may see a leaf emerging near a small bump or aerial root. That joint is a useful landmark when preparing a cutting.
What Is an Internode?
An internode is the section of stem between two nodes. Its length varies with the plant species and growing conditions.
A long internode can indicate that a plant has stretched while searching for light, although naturally long gaps are normal in some species. For most beginner-friendly nodal cuttings, avoid making the base cut in the middle of an internode when you can position it just below a node.
Some plants, including certain climbers, can root from internodal sections under suitable conditions. However, this is not the standard approach for many common houseplants.
Where Should You Make the Cuts?
For a typical nodal stem cutting, there are two useful reference points:
- Lower cut: Make it just below a healthy node, leaving the node attached to the cutting.
- Upper cut: If you need to shorten the piece, cut above a node, leaving enough stem and foliage for the cutting to remain stable.
This positioning helps ensure that the cutting includes a suitable rooting point. Avoid crushing the stem or leaving a long, unnecessary section below the lowest node.
Choose the Right Stem for Propagation
Even a perfectly positioned cut may fail if the original material is weak or unsuitable. Begin by inspecting the parent plant.
Choose a stem that is healthy, firm enough to handle, and free from visible pests, dark lesions, soft rot, or severe damage. A vigorous plant is usually a better source than one that is dehydrated, diseased, or struggling to grow.
For many softwood cuttings, young, flexible growth is suitable. Some plants root well from semi-mature stems, while others need more mature woody material. The correct choice depends on the species and season.
Whenever possible, select a non-flowering shoot. Flowering and seed production can compete with the resources needed for root formation in some plants.
It is also helpful to take cuttings when the parent plant is well hydrated but not waterlogged. The Royal Horticultural Society recommends collecting suitable material early in the day, when stems are less likely to be wilted.
Tools and Materials You Will Need
Prepare everything before cutting so the stem does not sit exposed for longer than necessary.
- Clean, sharp scissors, pruning snips, or a suitable knife
- A clean container or small pot with drainage holes
- A suitable propagation medium or clean water, depending on the plant
- A pencil or dibber to make a planting hole
- Plant labels, if propagating several varieties
- A clear cover or propagation dome, if appropriate for the method
Clean tools help reduce the risk of transferring disease between plants. Use a cutting tool that is sharp enough to make a neat cut rather than crushing the stem.
If you are handling a plant with irritating sap or one known to be toxic, use suitable gloves and keep cuttings away from children and pets.
How to Take a Stem Cutting Step by Step
Follow these steps for plants that are suited to nodal stem propagation. Adjust the cutting length and aftercare to the needs of the particular species.
1. Inspect the Parent Plant
Look for a healthy shoot with several leaves and clearly visible nodes. Avoid stems that show signs of pests, disease, or decay.
If the plant has long vines, you may be able to take several cuttings from one healthy stem. Make sure you leave enough foliage and growing points on the parent plant for it to recover.
2. Identify the Nodes
Trace the stem from its tip toward the base. Find the points where leaves or side shoots emerge.
Before cutting, decide which node will sit near the base of each cutting. This helps you avoid accidentally removing the very part needed for root development.
3. Make the Lower Cut
Using your clean tool, cut just below the selected node. A cutting around 8–10 centimeters long is suitable for many common houseplants, but this is a guide rather than a universal rule.
Some plants need shorter pieces, while others root better from longer cuttings. Follow species-specific recommendations whenever available.
4. Remove the Lower Leaves
Remove leaves that would be submerged in water or buried in the propagation medium. Leaves left underwater or below the surface can decay and encourage rot.
Keep a small amount of healthy foliage near the top. If the cutting has very large leaves, some species benefit from reducing leaf area to limit moisture loss. Do not remove all the leaves automatically, because the remaining foliage supports photosynthesis.
5. Place the Cutting in Water or Propagation Medium
For water propagation, place the lower node in clean water and keep the leaves above the surface. Refresh the water if it becomes cloudy or develops an unpleasant smell.
For soil-based propagation, fill a small pot with a suitable, well-draining propagation mix. Make a hole first so the stem is not damaged as you insert it, then position the cutting so the lower node is in contact with the medium.
Water the medium gently and allow excess water to drain. It should remain evenly moist where needed, not saturated.
6. Choose a Suitable Location
Place the cutting in a warm area with bright, indirect light unless the species requires something different. Strong direct sunlight can overheat a covered container and increase water loss from the leaves.
Some softwood cuttings benefit from a clear cover that helps maintain humidity. If you use one, allow fresh air to circulate regularly and remove dead material promptly. Excessive condensation and stagnant air can encourage fungal problems.
7. Watch for Root Development
Check the cutting regularly without pulling it out repeatedly. Water-grown cuttings may show roots directly through the container. In propagation mix, gentle resistance to a very light tug can suggest roots are forming, but avoid repeated testing because new roots are fragile.
The time needed varies considerably by species, temperature, light, and cutting condition. Do not assume that a cutting has failed simply because roots have not appeared within a few days.
Water or Soil: Which Method Is Better?
Both methods can work, but neither is best for every plant.
Water propagation makes root development easy to observe and is convenient for many familiar houseplants. However, roots formed in water develop under different conditions from roots grown in a potting medium. Transitioning a water-rooted cutting to soil may require careful attention to moisture as it adapts.
Propagation in a suitable growing medium allows roots to develop in conditions closer to those they will encounter after potting. The medium needs a balance of moisture and air, so ordinary dense garden soil may not be suitable for small cuttings.
If you are unsure which method to choose, use a reliable species-specific guide. Follow one method consistently rather than moving the cutting back and forth between water and soil without a clear reason.
Common Mistakes That Reduce Success
Cutting in the Wrong Place
A cutting without a suitable node may be unable to root using the standard nodal method. Recheck the stem before making the cut and ensure the intended rooting point remains on the cutting.
Using a Blunt or Dirty Tool
Crushed tissue can be more vulnerable to decay, while dirty tools may spread pathogens. Clean the tool and make a smooth cut.
Leaving Too Many Leaves
A small cutting can lose moisture quickly through its foliage. Keep enough leaves for photosynthesis, but remove those that would be submerged or buried. Reduce oversized leaves only when appropriate for the species.
Keeping the Medium Waterlogged
Cuttings need moisture, but their bases also need access to oxygen. Constantly saturated medium can encourage rot. Use a container with drainage and check the moisture before adding more water.
Placing Cuttings in Harsh Sunlight
Strong direct sun can dry or overheat the cutting before it has developed roots. Choose bright, indirect light for many common indoor cuttings, while checking the needs of the particular plant.
Giving Up Too Early
Rooting speed differs between species and conditions. Instead of repeatedly disturbing the cutting, look for gradual signs of progress, such as healthy leaves, visible roots, or new growth.
How to Care for a Cutting After It Roots
Once the cutting has developed a healthy root system, it can begin the transition to a more permanent growing container. Avoid moving it too early simply because one short root has appeared.
For a water-rooted cutting, pot it into a suitable mix and keep the medium appropriately moist while the roots adapt. For a cutting already rooted in propagation mix, transfer it carefully when it has enough roots to hold the medium together.
Choose a pot that fits the root system rather than one that is much too large. A container with drainage helps prevent excess water from accumulating around the roots.
Continue providing suitable light and avoid heavy fertilizing immediately after transplanting. Once the plant resumes active growth, adjust routine care to its species and growing conditions.
Frequently Asked Questions
Can I propagate any plant from a stem cutting?
No. Many plants root readily from stems, but others require different methods or are difficult to propagate this way. Confirm the appropriate method for your plant species.
Should I always cut below a node?
For most common nodal stem cuttings, yes: making the lower cut just below a node helps keep the rooting point on the cutting. Some plants use different techniques, so species-specific guidance takes priority.
Do I need rooting hormone?
Not always. Many easy-to-propagate plants can root without it. Rooting hormone may be useful for certain species or more difficult cuttings, but it cannot compensate for unhealthy material or poor growing conditions.
How long does it take for a cutting to root?
There is no single timeline. Some houseplants root within a few weeks, while other plants take longer. Temperature, plant type, stem maturity, and moisture all affect the process.
Better Cuts Begin with Careful Observation
Successful propagation is less about cutting at an exact measurement and more about understanding the plant in front of you. Find a healthy stem, identify its nodes, make a clean lower cut just beneath a suitable node, and provide the right balance of light, moisture, and airflow.
Start with a plant known to root easily, label your cuttings, and observe how they respond. With practice, you will become more confident at recognizing the right growth points and choosing the propagation method that best suits each plant.