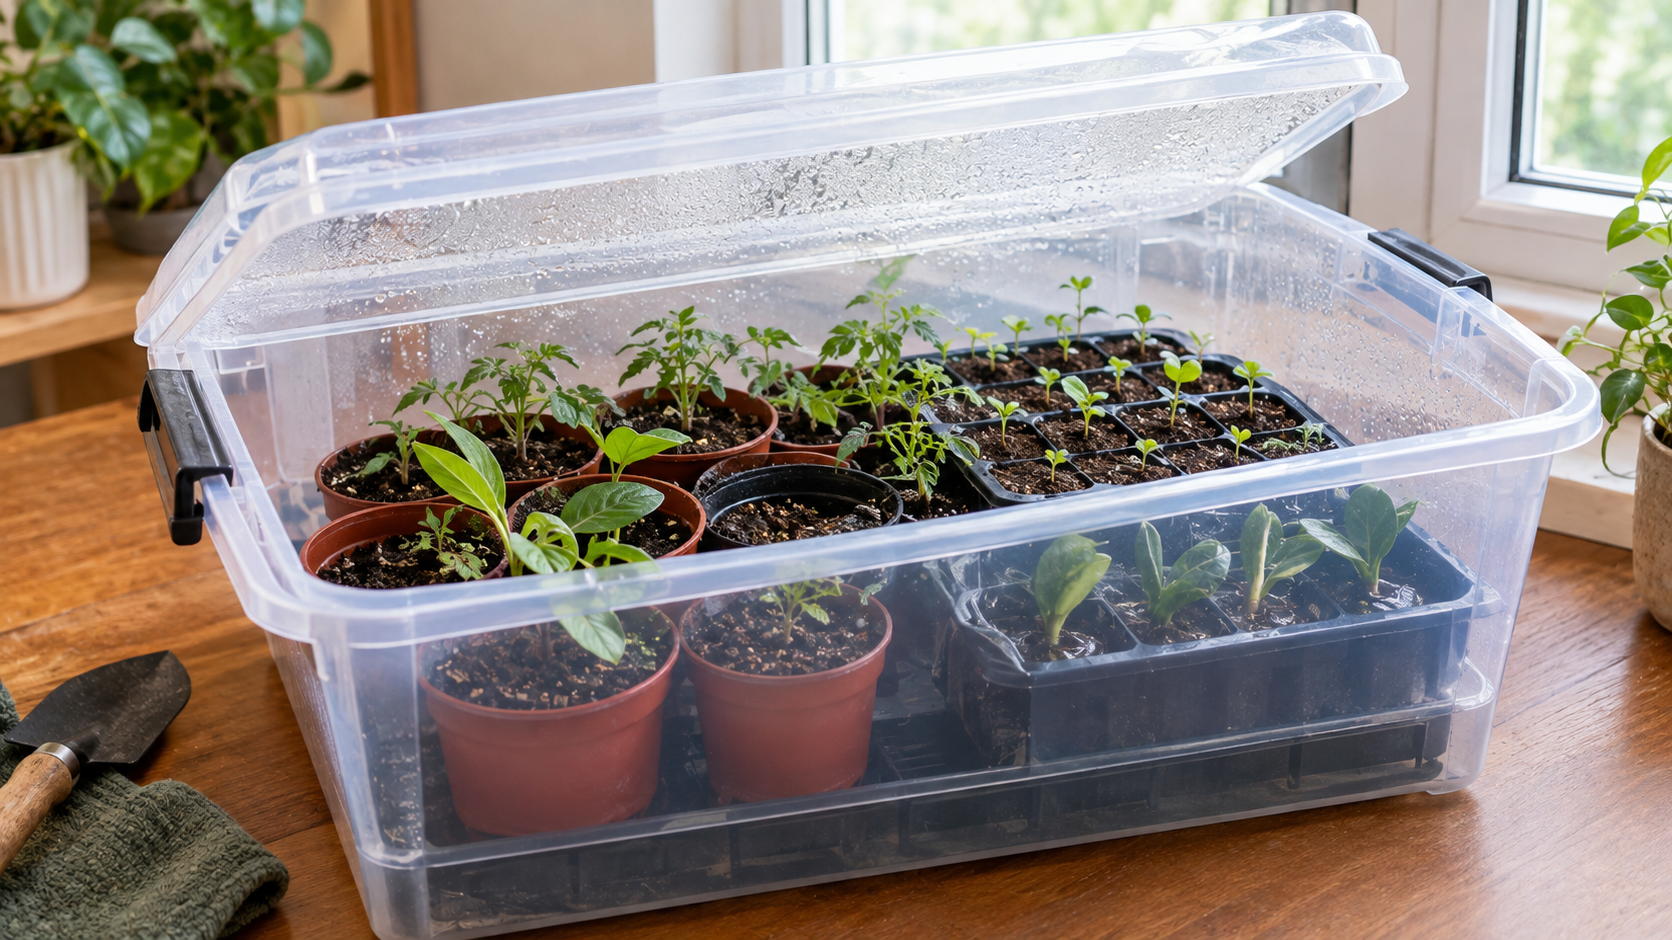
Starting seeds or propagating plant cuttings at home can be challenging when the air is dry or the potting mix loses moisture too quickly. A homemade mini greenhouse offers a simple solution: it creates a small, partially enclosed environment that helps reduce water loss and maintain more consistent humidity around developing plants.
You do not need an expensive greenhouse or specialized equipment to get started. A clean plastic container, a transparent storage box, or a clear cover placed over a suitable pot can work, provided the setup allows some air exchange and receives appropriate light.
However, high humidity is helpful only when it is balanced with ventilation, suitable temperatures, and careful watering. A completely sealed, overheated container can encourage mold, fungal diseases, and seedling collapse. The best mini greenhouse is one that protects delicate plants without keeping them excessively wet.
This guide explains which materials to use, how to assemble a homemade mini greenhouse, which plants benefit from it, and how to recognize when the cover should be adjusted or removed.
1. What Is a Homemade Mini Greenhouse?
A homemade mini greenhouse is a small enclosure that traps some of the moisture released by damp potting mix and plant leaves. Because less humid air continually replaces the air inside, water loss can be slower than in an exposed pot.
This is especially useful for seeds that need consistent moisture during germination and for many soft-stemmed cuttings that have not yet developed roots capable of absorbing enough water.
A mini greenhouse does not generate water or eliminate the need for watering. Instead, it changes the environment around the plant, helping the growing medium dry more slowly.
How does it help seedlings?
The main benefits include:
- More consistent moisture: The potting mix may remain evenly moist for longer between checks.
- Higher relative humidity: Delicate cuttings can lose less water through their leaves.
- Protection from drying air: A cover reduces the direct effect of drafts and air conditioning.
- A controlled propagation space: Several small pots can be grouped in one enclosure, making observation easier.
Not every plant needs a cover. Many established houseplants, drought-tolerant species, and seedlings already adapted to ordinary indoor conditions can grow perfectly well without one.
2. Materials You Need to Build a Mini Greenhouse
The best materials depend on the number and size of plants you want to propagate. Start with a setup that is easy to clean, inspect, ventilate, and adjust.
Useful materials include:
- A transparent plastic storage box, clear food container, or clean plastic bottle.
- Small pots or seed trays with drainage holes.
- A suitable seed-starting or propagation mix.
- Clean scissors or a utility knife, used carefully when cutting plastic.
- A transparent lid or clear plastic cover.
- Labels to identify seeds, cuttings, and planting dates.
- A spray bottle, watering can, or other controlled watering method.
Choose a container that leaves enough space between the cover and the leaves. Crowded foliage stays wet more easily and has less airflow, increasing the risk of disease.
Wash reusable containers before use and remove any food residue. Avoid containers that previously held hazardous chemicals.
Which type of container works best?

Clear plastic storage box
A good choice for several pots or a small propagation tray. A removable lid makes ventilation easy to adjust, and the plants can be inspected without disturbing them.

Transparent plastic bottle
Useful for a single small pot or cutting. Leave a way to open the top or remove the cover so the plant receives fresh air.

Seed tray with a clear dome
Convenient for germinating multiple seeds. Choose a tray with drainage and a dome that can be raised or opened when ventilation is needed.
3. How to Build Your Mini Greenhouse Step by Step
Once you have your materials, assembly is straightforward. The most important details are drainage, adequate space, and a cover that can be opened easily.
Step 1: Prepare the growing containers
Use pots or seed trays with drainage holes. Fill them with a clean seed-starting mix or a propagation medium suited to the plant.
Avoid ordinary garden soil in small containers because it can be too dense and may drain poorly. Moisten the medium before planting so that it is evenly damp rather than saturated.
Step 2: Plant the seeds or cuttings
Sow seeds at the depth recommended on the seed packet. Different species have different germination requirements, and some seeds need light to germinate while others need to be covered.
For cuttings, prepare healthy plant material using clean tools and place it in an appropriate rooting medium. Remove leaves that would otherwise sit beneath the surface, and avoid burying foliage.
Label each container with the plant name and date. This makes it easier to track germination and rooting progress.
Step 3: Position the transparent cover
Place the pots inside the clear storage box or cover the tray with a transparent lid. For a plastic bottle greenhouse, position the cut bottle over the pot without crushing the foliage.
If you use a plastic bag, support it with clean sticks or small hoops so it does not rest directly on the leaves. Keep the cover slightly open or provide adjustable ventilation.
Step 4: Choose a suitable location
Place the enclosure in bright, indirect light unless the plant’s specific germination requirements call for something different.
Do not place a closed plastic greenhouse in direct sunlight. Even on a mild day, sunlight can rapidly heat the air inside the enclosure and damage seedlings.
A bright room away from intense sun is often a safer starting point. If natural light is insufficient, an appropriate grow light can help support healthy development.
Step 5: Check moisture and ventilation daily
Inspect the growing medium, leaves, and inside of the cover each day.
The mix should remain moist enough for the particular seeds or cuttings, but it should not become waterlogged. Open the lid when condensation is excessive or when the enclosure feels unusually warm.
A small amount of condensation can be normal. Heavy droplets that persist alongside soggy soil, mold, or unpleasant odors suggest that moisture and ventilation need attention.
4. How to Control Humidity Without Encouraging Mold
The aim is not to create the wettest possible environment. It is to reduce excessive moisture loss while preserving enough airflow to keep plant tissues and the growing medium healthy.
What does condensation tell you?
Condensation forms when moist air inside the enclosure meets a cooler surface. Its presence indicates moisture in the enclosed air, but it does not provide a precise measurement of humidity or prove that the roots have enough water.
Use condensation as one observation, not the only watering guide.
- Light condensation with moist, airy mix: Usually continue monitoring.
- Heavy condensation and saturated mix: Increase ventilation and allow excess moisture to drain.
- No condensation and a drying mix: Check the medium directly; add water if needed.
- Visible mold or a musty smell: Improve airflow, reduce excess moisture, and remove affected material where appropriate.
How much ventilation is necessary?
There is no single opening size that works for every container. Temperature, plant species, container volume, and the number of seedlings all affect airflow.
Start with a slightly open lid or adjustable vents. If the medium dries too quickly, reduce the opening modestly. If moisture remains excessive or fungal growth appears, increase airflow.
For cuttings that are particularly sensitive to drying, a more enclosed setup may be useful initially. As roots develop, gradually increase ventilation so the plant can adjust to ordinary room conditions.
5. Which Plants Benefit Most From a Mini Greenhouse?
A mini greenhouse is most useful for plants that need stable moisture during a vulnerable stage of development. The correct approach depends on whether you are germinating seeds, rooting cuttings, or caring for newly emerged seedlings.
Seeds that need consistent moisture
Many vegetable, herb, and ornamental seeds benefit from a transparent cover during germination. Tomatoes, peppers, basil, and various annual flowers are common examples, although their specific temperature, light, and sowing requirements differ.
Once seedlings emerge, remove the cover promptly or begin transitioning them to uncovered conditions. Established seedlings need adequate airflow and light to develop strong growth.
Soft-stemmed cuttings
Many tropical foliage plants root more successfully when the surrounding humidity is elevated. A clear cover can help prevent the leaves from losing water before new roots develop.
However, not all cuttings need the same amount of humidity. Plants with thick, water-storing leaves, such as many succulents, may be more vulnerable to rot in a continuously damp enclosure. Follow the propagation requirements of the particular species.
Plants that generally do not need a humidity dome
Established houseplants usually do not need to be enclosed simply because the indoor air feels dry. Likewise, cacti and many succulents are generally better managed without a persistently humid cover.
A mini greenhouse is a propagation tool, not a universal solution for every plant.
6. When and How to Remove the Cover
Removing the cover at the right time is just as important as building the enclosure.
For most seed-starting projects, remove the humidity dome when seedlings emerge, following any species-specific instructions. If several seeds are germinating at different times, avoid keeping the earliest seedlings enclosed indefinitely just to accommodate seeds that have not yet sprouted.
For cuttings, wait until they have developed roots or show other reliable signs of establishment. Rooting time varies substantially by plant species and environmental conditions.
Use this gradual transition when appropriate:
- Open the lid or increase the ventilation for short periods.
- Extend the uncovered period as the plant tolerates the change.
- Monitor leaves for persistent wilting and check that the growing medium does not dry excessively.
- Remove the cover permanently once the plant can maintain itself in the surrounding environment.
Seedlings generally need to acclimate to normal indoor conditions, while rooted cuttings may require a slower transition if they were maintained under very high humidity.
Do not compensate for wilting by automatically saturating the soil. Check moisture first, because wilting can occur from both water shortage and damaged roots.
7. Common Mistakes to Avoid
A homemade mini greenhouse is simple, but a few mistakes can undermine its benefits.
- Sealing the container permanently: Stagnant, humid air can encourage fungal growth. Allow air exchange and inspect the plants regularly.
- Overwatering before covering: A closed environment slows drying, so waterlogged soil may remain saturated for too long.
- Placing it in direct sunlight: The enclosure can overheat even when the surrounding room feels comfortable.
- Ignoring drainage: Every growing pot should allow excess water to escape.
- Leaving the cover on after germination: Prolonged enclosure can increase disease risk and contribute to weak, elongated growth.
- Using dirty containers or tools: Residual plant debris and contaminated equipment can introduce unwanted organisms.
- Assuming every species needs high humidity: Different plants have different propagation requirements.
If mold develops, first assess whether the medium is too wet, airflow is inadequate, or the enclosure is too warm. Improve these conditions rather than automatically applying chemical treatments.
Frequently Asked Questions
Do I need to make holes in a plastic mini greenhouse?
Ventilation openings can help regulate humidity and airflow, but they are not the only option. A removable lid that can be left slightly open may provide sufficient air exchange for a small setup. Plant density and environmental conditions determine how much ventilation is needed.
Should I water plants inside a mini greenhouse?
Yes, when the growing medium needs water. Check the soil before watering, and apply only enough to maintain the moisture requirements of the plant. A covered container generally loses moisture more slowly than an uncovered one.
Can I use a plastic bag instead of a container?
Yes. A clear plastic bag supported above the foliage can work well for individual pots or a small group of cuttings. Keep the bag from resting on the leaves, and leave a small opening for air exchange.
How long should seedlings stay inside a mini greenhouse?
Many seedlings should be uncovered soon after emergence. Cuttings may need a longer period of elevated humidity while they form roots. Use the needs of the plant and its stage of development to determine the timing.
A Simple Mini Greenhouse That Works With Your Plants
A homemade mini greenhouse can be an inexpensive and practical way to help delicate seedlings and cuttings maintain moisture. Start with a clean transparent container, a suitable growing medium, adequate drainage, and a location with appropriate light.
Then focus on three things: moisture, temperature, and airflow. Check the enclosure daily, respond to signs of excessive condensation or drying, and remove the cover when the plants are ready.
The goal is not to trap as much humidity as possible, but to create a stable environment that supports healthy roots and new growth. Start with a small batch of seeds or cuttings, observe how the setup behaves, and adjust the ventilation before expanding your propagation project.